🗣️ How to Add Omakase.ai Voice to Your Site
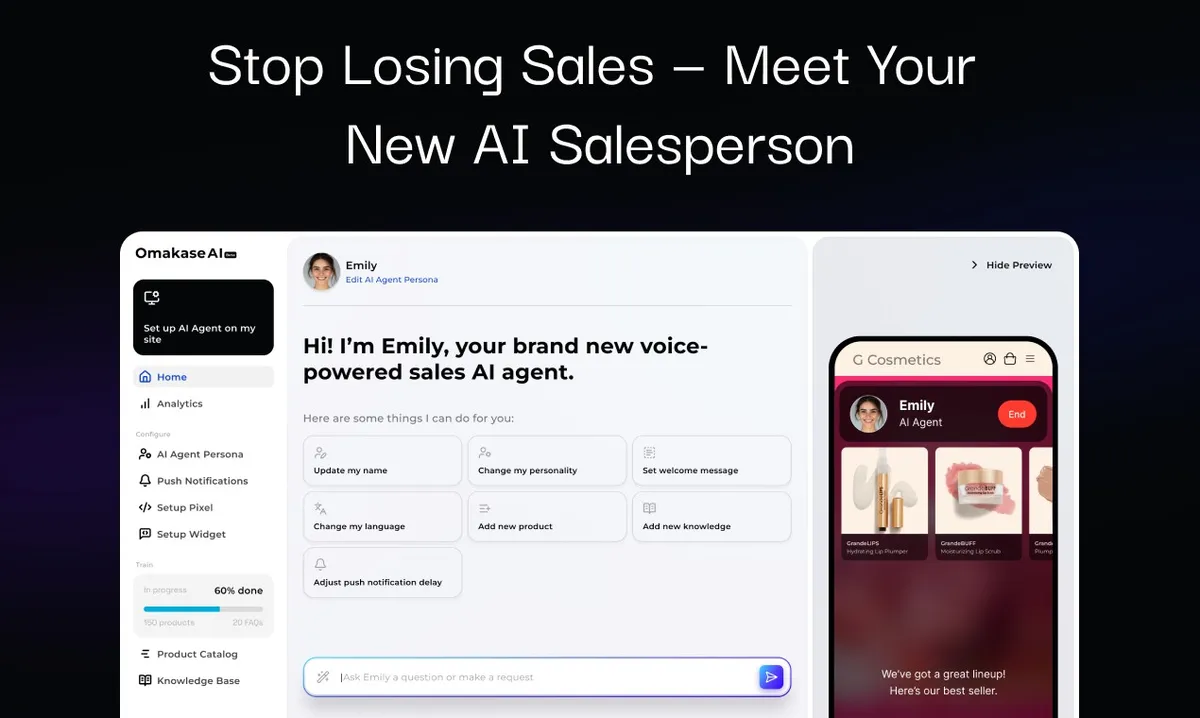
So you’re ready to let your website talk — awesome. Omakase.ai Voice turns your site into a voice-powered sales machine that listens, recommends, and converts.
All you need to do is add a small snippet of code before the </body> tag on your site.
This guide will walk you through the steps for these platforms:
- Shopify (check out our blog about our Shopify App)
- Google Tag Manager
- Wix
- WordPress
- Squarespace
Here are the basic instructions, with more detailed walkthroughs deeper in this post:
- Shopify (editing
theme.liquid) - Google Tag Manager (Custom HTML tag + All Pages trigger)
- Wix (Custom Code section in settings, load at body end)
- WordPress (manual edit of
footer.phpvia Theme File Editor) - Squarespace (paste into Footer section of Code Injection settings)
Let’s get into it!
🔑 The Code Snippet
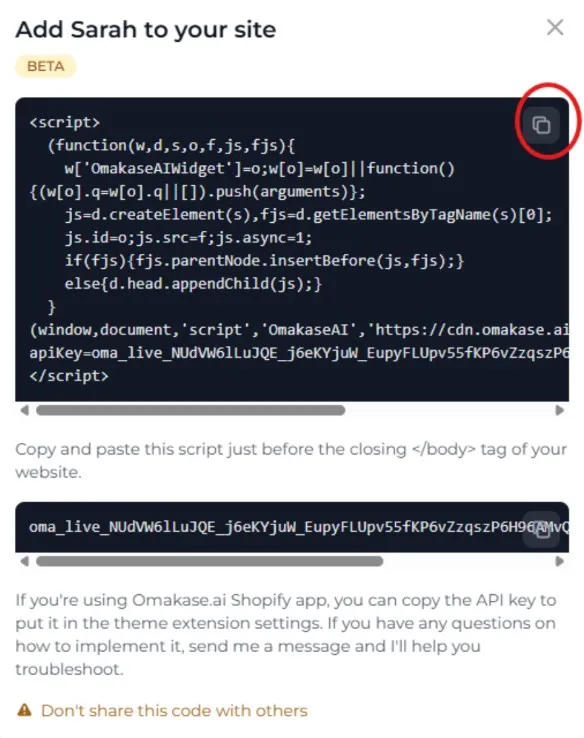
You’ll paste the code before the closing </body> tag in your site’s theme or settings.
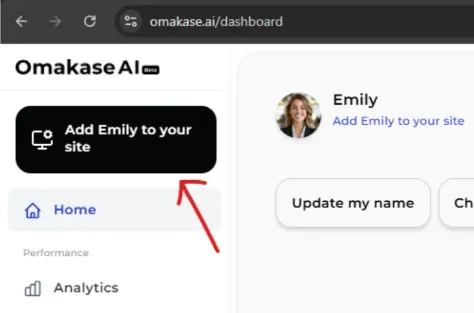
Where do you find your snippet of code? Tap add “your agent’s name” to your site on the top left of your dashboard (logged in)
Here’s what that will look like—helpful hint, tap the copy button located on the top right to capture all of the code quickly
🛍️ Shopify
1. Go to your Shopify Admin
Navigate to Online Store > Themes
2. Edit Your Theme Code
Click the three dots next to your live theme, then select “Edit code.”
3. Find the theme.liquid File
In the Layout folder, click on theme.liquid.
4. Paste Before </body>
Scroll to the bottom and paste your code snippet just above </body>.
5. Save
Click Save, and you’re done!
🧩 Google Tag Manager (GTM)
1. Go to Your GTM Workspace
Log in to Google Tag Manager, and select your container
2. Create a New Tag
- Click Tags > New
- Name it something like Omakase Voice Agent
3. Set up the tag
- Choose Custom HTML as the tag type
- Paste the script inside the HTML box
4. Set the Trigger
Click Triggering, and select “All Pages“
5. Save & Publish
Save your tag and click Submit to publish changes.
🌐 Wix
1. Go to your site dashboard
In your Wix editor, click on Settings > Custom Code.
2. Add Custom Code
- Click + Add Custom Code
- Paste the script into the box
- Choose to place code in the Body - end
3. Apply to All Pages
Set the code to run on All Pages, and load once per visit.
4. Save and Publish
Click Save and then Publish your site.
📝 WordPress (Without a Plugin)
1. Access Theme Editor
From your WordPress Dashboard, go to Appearance > Theme File Editor
⚠️ Pro Tip: Use a child theme or back up your theme before editing directly.
2. Open footer.php
Find and open the footer.php file.
3. Paste the Code
Paste the script just before the </body> tag.
4. Save Changes
Click Update File
🟫 Squarespace
Adding Omakase Voice to your Squarespace site is quick and easy — just drop the script into your Code Injection settings.
1. Log into Squarespace
Head to squarespace.com and log in to your dashboard.
2. Go to Code Injection Settings
In the left-hand menu:
- Click Settings
- Then Advanced
- Select Code Injection
3. Paste the Script into the Footer Section
Scroll to the Footer box (this is where Squarespace places code before the closing </body> tag).
Paste the full Omakase Voice script here:
4. Save Your Changes
Scroll down and hit Save in the top left.
💬 Final Tips
- You can test your Voice Agent instantly after adding the script by refreshing your site.
- Want to customize the behavior or voice of your agent? Just reach out — we’re here to help.
- Need help? Email us at sales@omakase.ai or schedule a call with our Head of Customer Success
🎉 That’s it — You’re Live!
Once the script is in place, your Voice Agent will automatically activate. No extra setup required. You’re now giving your visitors a whole new way to engage — by talking. Let us know how it goes. We’d love to hear what your Voice Agent is saying. 😊